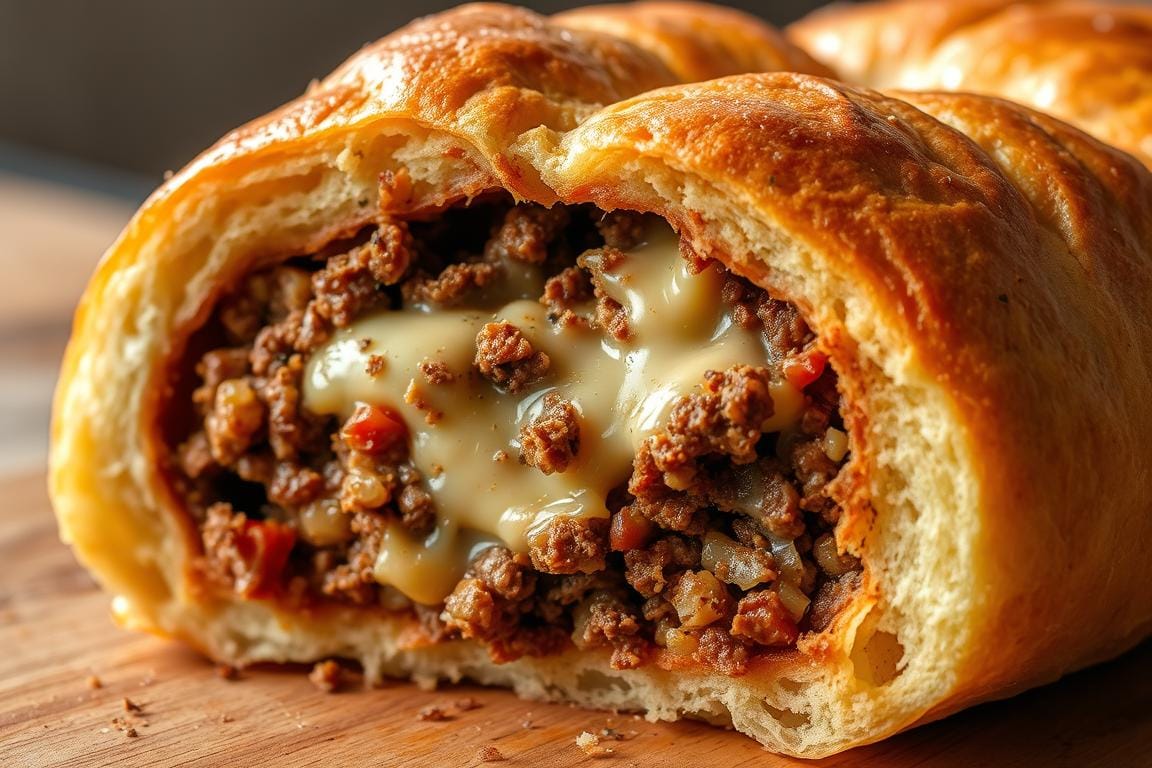
Savory Beef & Cheese Stuffed Bread – Easy Recipe
Ever crave a meal that’s both comforting and exciting? This Beef and Cheese Stuffed Bread transforms simple ingredients into a dish that’s bursting with flavor and nostalgia. Inspired by gas station-inspired meals, it’s a creative twist on classic flavors that’s perfect for any occasion.
Using refrigerated dough, this recipe saves time without sacrificing taste. The combination of savory meat, melted cheese, and a golden brown crust makes it a crowd-pleaser. Whether you’re hosting a small gathering or need a quick snack, this dish delivers.
From preparing the dough to baking it to perfection, every step is straightforward. You’ll love how versatile it is—feel free to experiment with ingredients to make it your own. Ready to dive in? Let’s get started!
Table of Contents
Introduction: Discovering the Perfect Recipe
Looking for a dish that’s both nostalgic and easy to make? This recipe brings together the best of both worlds. It’s inspired by the classic snacks you’d find at gas stations in Louisiana—quick, satisfying, and full of flavor.
What Makes This Recipe Special
What sets this dish apart is its simplicity. Using refrigerated dough saves time, while the combination of savory meat and melted cheese creates a rich, irresistible flavor. It’s perfect for using up leftovers or customizing to your taste.
Whether you’re hosting a game-day party or need a quick snack, this recipe delivers. The golden brown crust and gooey filling make it a hit every time.
Inspiration from Classic Gas Station Favorites
This recipe draws inspiration from the stuffed breads sold at Louisiana gas stations. These treats were a go-to for locals—grab one on the way to work, after church, or during a road trip.
The unique blend of ingredients, like pickles and sauces, adds a nostalgic touch. It’s a meal that feels familiar yet exciting, perfect for any occasion.
Ready to bring this classic to your kitchen? Let’s dive into the recipe and make something unforgettable.
Ingredients for the Savory Beef & Cheese Stuffed Bread
The foundation of this recipe lies in its simple yet impactful ingredients. Each component plays a crucial role in creating the perfect balance of flavor and texture. Whether you’re a seasoned cook or a beginner, these items are easy to find and work with.

Essential Ingredients List
Here’s what you’ll need to bring this dish to life. Make sure to measure accurately for the best results:
| Ingredient | Quantity |
|---|---|
| Refrigerated French bread dough | 1 package (13.8 oz) |
| Ground beef | 1 pound |
| Diced onion | ½ cup |
| Ketchup | 2 tablespoons |
| Mustard | 1 tablespoon |
| Bacon | 4 slices, cooked and crumbled |
| Pickles | ¼ cup, chopped |
| American cheese | 4 slices |
| Large egg | 1, beaten |
| Salt | ½ teaspoon |
| Pepper | ¼ teaspoon |
Substitutions and Ingredient Variations
This recipe is highly customizable. If you’re out of an ingredient or want to try something new, here are some ideas:
- Ground meat: Swap ground beef for chicken or turkey for a lighter option.
- Cheese: Use mozzarella or cheddar instead of American for a different flavor profile.
- Vegetables: Add bell peppers or jalapeños for extra crunch and spice.
- Sauces: Replace ketchup and mustard with barbecue sauce or ranch dressing.
With these ingredients and variations, you’re ready to move on to the next steps. Let’s get cooking!
Prepping Your Dough and Meat Filling
Ready to master the art of prepping dough and filling? This step-by-step guide ensures your dish turns out perfectly every time. From handling the dough to cooking the meat mixture, we’ve got you covered.

Dough Preparation and Handling Tips
Start by lightly flouring your work surface to prevent food from sticking. Roll out the refrigerated dough into a rectangle, about 12×8 inches. This size ensures it can fully encase the filling without tearing.
Avoid overworking the dough, as it can become tough. If it feels sticky, sprinkle a bit more flour. Let it rest for 5 minutes before adding the filling. This makes it easier to handle and shape.
Cooking and Seasoning the Meat Mixture
Heat a pan over medium heat and add the ground meat. Cook until browned, breaking it into small crumbles. Add diced onions and cook until softened, about 3-4 minutes.
Season generously with salt and pepper for maximum flavor. For a richer taste, mix in 1 tablespoon of ketchup and 1 teaspoon of mustard. Let the mixture cool slightly before adding it to the dough.
| Step | Time | Tips |
|---|---|---|
| Rolling Dough | 5 minutes | Use a floured surface to prevent sticking. |
| Cooking Meat | 10 minutes | Break into small crumbles for even distribution. |
| Seasoning | 2 minutes | Adjust salt and pepper to taste. |
Pre-measuring your ingredients saves time and ensures a smooth cooking process. Follow these steps, and you’ll have a perfectly prepped dough and filling ready for assembly.
Beef & Cheese Stuffed Bread Assembly Techniques
Assembling this dish is easier than you might think, and the results are worth every step. The key lies in carefully rolling, filling, and sealing the dough to create a delicious, golden brown masterpiece. Let’s break it down into simple, actionable steps.

Rolling, Filling, and Sealing the Dough
Start by laying the prepared dough on a lightly floured surface. Gently spread the meat mixture evenly across the surface, leaving a small border around the edges. This ensures the filling stays inside during baking.
Next, layer your toppings—bacon, pickles, and cheese—over the meat. Roll the dough tightly from the long end, forming a log. Press the edges firmly to seal the seam. This step is crucial to prevent leaks in the oven.
Use your hands to pinch the edges together, creating a secure seal. Don’t worry if it looks a bit rustic—this adds to the homemade charm. Place the rolled dough on a baking sheet, seam side down, for even cooking.
- Even Coverage: Spread the filling evenly to avoid uneven bites.
- Tight Roll: Roll the dough firmly to keep the filling intact.
- Secure the Seam: Pinch the edges well to lock in the flavors.
Brush the top with a beaten egg for a golden brown finish. This step not only adds color but also enhances the texture. Now, your dish is ready for the oven!
With these techniques, you’ll master the assembly process in no time. The result? A perfectly rolled, flavorful dish that’s as fun to make as it is to eat.
Baking, Finishing Touches, and Serving Suggestions
Achieving the perfect bake is the final step to creating a mouthwatering dish. The right oven settings and timing ensure a golden brown crust while keeping the inside tender and flavorful. Let’s dive into the details to make your creation shine.
Baking Temperature and Timing Insight
Preheat your oven to 350°F for even cooking. Place the prepared dough on a baking sheet and bake for 20-25 minutes. This ensures the crust turns golden brown and the filling heats through perfectly.
To check for doneness, look for a firm, golden crust. If the dough feels soft, bake for an additional 2-3 minutes. For an extra touch, brush the top with a beaten egg wash before baking. This adds a glossy finish and enhances the texture.

Garnishing and Pairing with Dipping Sauces
Once baked, let the dish cool slightly before slicing. For added flavor, brush the top with melted butter or sprinkle sesame seeds. These finishing touches elevate the dish’s appearance and taste.
Pair your creation with dipping sauces for a complete experience. Try creamy horseradish, Thousand Island, or a tangy ranch dressing. These sauces complement the savory filling and add a burst of flavor.
| Step | Details |
|---|---|
| Baking | 350°F for 20-25 minutes |
| Checking Doneness | Golden brown crust, firm texture |
| Garnishing | Brush with butter or sprinkle sesame seeds |
| Serving | Pair with dipping sauces like horseradish or ranch |
Serve the dish warm or at room temperature for the best taste. If you have leftovers, reheat them in the oven at 300°F for 5-7 minutes to maintain the crispy texture. This ensures every bite is as delicious as the first.
Creative Variations and Leftover Ideas
Want to take your cooking to the next level with creative twists? This recipe is incredibly versatile, allowing you to experiment with different flavors and ingredients. Whether you’re looking to switch up the filling or repurpose leftovers, there’s always room for innovation.

Flavor Innovations and Alternate Fillings
Why stick to the basics when you can explore new flavors? Swap the traditional filling for BBQ chicken, smoked sausage, or even a vegetarian mix. Add a layer of marinara sauce and mozzarella for a pizza-inspired version, or try a breakfast twist with scrambled eggs and bacon.
Here are some ideas to get you started:
- Meat Alternatives: Use ground turkey, chicken, or plant-based options for a lighter or vegetarian-friendly dish.
- Cheese Variations: Experiment with cheddar, mozzarella, or pepper jack for a different flavor profile.
- Sauce Swaps: Replace ketchup and mustard with barbecue sauce, ranch, or even pesto for a unique twist.
Proper Storage and Reheating Methods
Got leftovers? No problem! Store your creation in an airtight container in the refrigerator for up to 3 days. For longer storage, wrap it tightly in foil or plastic wrap and freeze for up to 2 months.
When you’re ready to enjoy it again, here’s how to reheat it:
- Oven: Bake at 350°F for 10 minutes to restore the crispy crust.
- Microwave: Heat for 1-2 minutes for a quick option, though the crust may soften.
- Air Fryer: Reheat at 350°F for 5-7 minutes for a crunchy finish.
With these tips, you can enjoy your dish fresh or reheated, making it a practical option for busy days. Don’t be afraid to experiment—each variation can turn this recipe into your signature dish for any occasion.
Conclusion
Bringing this recipe to life is simpler than you might expect, with results that are both satisfying and versatile. From preparing the dough to baking it to perfection, each step is designed for ease. The rich flavors and golden crust make it a standout dish for any occasion.
Feel free to experiment with ingredients to make it your own. Whether served hot or reheated later, it retains its delicious texture and taste. Store leftovers in the fridge or freezer for quick meals throughout the week.
Don’t forget to print the recipe for easy reference in your kitchen. With a little practice, this dish will become a go-to favorite. Share your feedback and enjoy the process of creating something truly special!
FAQ
Can I use store-bought dough for this recipe?
What’s the best way to seal the dough to prevent leaks?
Can I substitute ground beef with another protein?
How do I know when the bread is fully baked?
Can I freeze the stuffed bread for later?
What dipping sauces pair well with this dish?
Can I add vegetables to the filling?
How long does it take to prepare this recipe?
What’s the ideal oven temperature for baking?
Can I make this recipe ahead of time?

Savory Beef & Cheese Stuffed Bread – Easy Recipe
- Total Time: 40 minutes
- Yield: 6 servings 1x
Description
A comforting, nostalgic dish inspired by Louisiana gas station favorites, this Savory Beef & Cheese Stuffed Bread uses refrigerated dough to simplify prep. Filled with seasoned ground beef, gooey American cheese, crispy bacon, and zesty pickles, it’s perfect for game day, gatherings, or a quick satisfying snack. Bake to golden brown perfection and serve with your favorite dipping sauces.
Ingredients
1 package (13.8 oz) refrigerated French bread dough
1 lb ground beef
½ cup diced onion
2 tbsp ketchup
1 tbsp mustard
4 slices bacon, cooked and crumbled
¼ cup chopped pickles
4 slices American cheese
1 large egg, beaten (for egg wash)
½ tsp salt
¼ tsp pepper
Instructions
Preheat oven to 350°F (175°C).
In a skillet, cook ground beef over medium heat until browned. Add diced onions and sauté 3–4 minutes until softened. Stir in ketchup, mustard, salt, and pepper. Let cool slightly.
Roll out the refrigerated dough on a lightly floured surface to a 12×8-inch rectangle.
Spread the beef mixture evenly over the dough, leaving a border. Top with crumbled bacon, pickles, and American cheese slices.
Roll the dough tightly from the long side to form a log. Pinch edges and seams to seal.
Place the seam side down on a baking sheet lined with parchment. Brush the top with beaten egg.
Bake for 20–25 minutes or until the crust is golden brown.
Let cool for 5 minutes before slicing. Serve with dipping sauces like ranch or horseradish.
Notes
Feel free to substitute ground turkey or chicken.
Try other cheeses like mozzarella or cheddar for a twist.
Add veggies like bell peppers or jalapeños for extra crunch and spice.
Leftovers can be stored in the fridge for up to 3 days or frozen for up to 2 months.
- Prep Time: 15 minutes
- Cook Time: 25 minutes
- Category: Appetizer, Snack, Main Course
- Method: Baking
- Cuisine: American (Southern-inspired)
Keywords: Stuffed bread, ground beef, easy bake, cheese-filled bread, savory snack, gas station inspired, quick appetizer, party food
What Are Our Readers Saying?
There are no reviews yet. Be the first one to write one.